|

|
 |
Fast Nationwide Service
Car Audio Systems, Stereo Systems,
Amplifiers, Antennas and Radios
|
Since 1975 RADIOMAN
has specialized in high end car audio radio repairs.
3801 Gaines
Street
San Diego, CA 92110
619-298-6700
|
|
GENERAL INSTRUCTIONS
for removing your radio, CD changer, or
amplifier |
|
BMW
Mercedes Benz
Ford General
Motors Lexus |
| BMW: |
BMW 6 DISC CD Changers
This changer is attached in the trunk by two screws above the unit. Once unscrewed, the changer
slides forward off of the mounting bracket. There is a connector on the black wire about 10 inches from the unit that unplugs, and another wire that unplugs.
When this changer is mounted in a vertical position, usually on the left side of the
trunk, you may not be able to get to the screws that attach the
changer to the mounting bracket. In this case, you can remove the 3 bolts on the
changer's metal bracket from the body of the trunk and remove the changer
with the bracket attached.
|
BMW Stereo Radio
The radio is removed by opening the two small hinged flaps and
loosening/unscrewing the security screws with a pent allen key or a
hex if you are careful not to damage the brass.
|
BMW Amplifier
The amp is in the trunk on the left side under the trunk liner.
|
Alpine radios in BMW 90's models
First, pull off the volume control knob on the left hand side of
the display unit. Below and behind the knob's shaft is a hole
with an Allen screw head. Insert the appropriate Allen Wrench to
turn it 90 degrees. This unlatches the left side and the display
unit pops out.
Some earlier models do not have the volume control latch, so you
will need to start with the cup holder assembly (removed with 2
screws) and remove components (possible the climate control unit) up
along the center console until the tuner/tape deck can be accessed.
In either case, to remove the tuner/tape deck, look into the
small holes near the sides beside the brass alignment pins and locate
the Allen screws. They will be a different size than the screw
located, if applicable, behind the volume control knob. Unscrew
these on both sides with the appropriately sized Allen wrench.
After several turns on both sides, you will feel the unit pop
out. Ship the unit to Radioman for your repair!
To install, reverse the procedure. Thanks to a customer
from patientprograms.com for suggesting this procedure be posted.
|
| MERCEDES BENZ |
Mercedes Benz Stereo Radio
1992 and earlier models
The radio has clips located underneath towards the front on each
side. To access these clips, the ashtray assembly must be
removed (and sometimes a upholstery panel needs to be removed as well
if the radio is not laying directly on the ashtray assemble). To
remove the ashtray assembly, take out the tray as if you were emptying
it then located the screws inside the assembly. Unscrew the
assembly from the car and remove. The bottom of the radio will
be exposed and you can depress the clips to lift up and remove the
radio.
1993 and later models
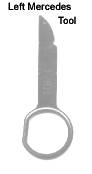 |
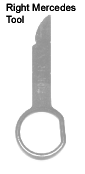
The radio has a slot on each lower left and
lower right corner of the front face. Obtain the Mercedes
tools (see images) from a radio shop or Mercedes Dealership and
slide them into the slots. Unlock the radio by gently
moving the tools left and right; be sure you have the tools
inserted properly and do not attempt to use a screwdriver or
other flat instrument that might damage your radio. |
 |
|
| FORD |
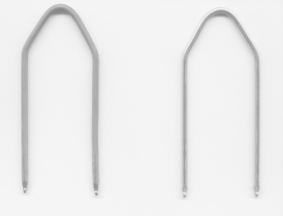
Using Ford Removal Tools (see images; u-shaped
tools by the name of Metra available at AutoZone, also known as DIN
tools) inserted into the two holes on the left side and the two holes
on the right side of the radio, release the internal lock and pull the
radio forward. Some may use welding rods or coat hangers but it
is best to use the tools, which make the job very simple.
Disconnect the negative battery terminal to prevent a possible short
circuit.
|
| GENERAL MOTORS |
In general (no pun intended), the fascia surrounding the radio
must be removed to expose the screws and clips securing the radio to
the chassis. For some models, this may be a simple task and, for
others, it is rather involved, as much as removing the entire
dashboard casing. Look for screws in addition to clips that hold
the fascia in place.
|
| LEXUS |
In general, fascia surrounding the radio must be removed to
expose screws securing the radio to the chassis. Depending on
your model, the air vents and ashtray will need to be removed in order
to expose screws in their cavities.
|
|
Back to Radioman Home
|